本教程提供了有关如何将CSV数据从文件加载到tf.data.Dataset的示例。

本教程中使用的数据取自《泰坦尼克号》乘客列表。该模型将根据年龄,性别,机票等级以及是否独自旅行等特征来预测乘客幸存的可能性。

设定

 1
 2
 3
 4
 5
 6
 7
 8
 9
10
11
12
13
14
15
16
17
18
from __future__ import absolute_import, division, print_function, unicode_literals
import functools
import numpy as np
import tensorflow as tf

TRAIN_DATA_URL = "https://storage.googleapis.com/tf-datasets/titanic/train.csv"
TEST_DATA_URL = "https://storage.googleapis.com/tf-datasets/titanic/eval.csv"

train_file_path = tf.keras.utils.get_file("train.csv", TRAIN_DATA_URL)
test_file_path = tf.keras.utils.get_file("eval.csv", TEST_DATA_URL)

Downloading data from https://storage.googleapis.com/tf-datasets/titanic/train.csv
32768/30874 [===============================] - 0s 0us/step
Downloading data from https://storage.googleapis.com/tf-datasets/titanic/eval.csv
16384/13049 [=====================================] - 0s 0us/step

# Make numpy values easier to read.
np.set_printoptions(precision=3, suppress=True)

加载数据

首先,让我们看一下CSV文件的前几行,以了解其格式。

 1
 2
 3
 4
 5
 6
 7
 8
 9
10
11
12
!head {train_file_path}

survived,sex,age,n_siblings_spouses,parch,fare,class,deck,embark_town,alone
0,male,22.0,1,0,7.25,Third,unknown,Southampton,n
1,female,38.0,1,0,71.2833,First,C,Cherbourg,n
1,female,26.0,0,0,7.925,Third,unknown,Southampton,y
1,female,35.0,1,0,53.1,First,C,Southampton,n
0,male,28.0,0,0,8.4583,Third,unknown,Queenstown,y
0,male,2.0,3,1,21.075,Third,unknown,Southampton,n
1,female,27.0,0,2,11.1333,Third,unknown,Southampton,n
1,female,14.0,1,0,30.0708,Second,unknown,Cherbourg,n
1,female,4.0,1,1,16.7,Third,G,Southampton,n

你可以使用pandas加载它,并将NumPy数组传递给TensorFlow。如果你需要扩展到一个大的文件集,或者需要一个与TensorFlow和tf.data集成的数据集,请使用tf.data.experimental.make_csv_dataset函数:

唯一需要明确标识的列是模型要预测的值的列。

1
2
LABEL_COLUMN = 'survived'
LABELS = [0, 1]

现在,从文件中读取CSV数据并创建一个数据集。(有关完整文档,请参阅tf.data.experimental.make_csv_dataset

 1
 2
 3
 4
 5
 6
 7
 8
 9
10
11
12
13
14
15
16
17
18
19
20
21
22
def get_dataset(file_path, **kwargs):
  dataset = tf.data.experimental.make_csv_dataset(
      file_path,
      batch_size=5, # Artificially small to make examples easier to show.
      label_name=LABEL_COLUMN,
      na_value="?",
      num_epochs=1,
      ignore_errors=True,
      **kwargs)
  return dataset

raw_train_data = get_dataset(train_file_path)
raw_test_data = get_dataset(test_file_path)

WARNING:tensorflow:From /tmpfs/src/tf_docs_env/lib/python3.6/site-packages/tensorflow_core/python/data/experimental/ops/readers.py:521: parallel_interleave (from tensorflow.python.data.experimental.ops.interleave_ops) is deprecated and will be removed in a future version.
Instructions for updating:
Use `tf.data.Dataset.interleave(map_func, cycle_length, block_length, num_parallel_calls=tf.data.experimental.AUTOTUNE)` instead. If sloppy execution is desired, use `tf.data.Options.experimental_determinstic`.

def show_batch(dataset):
  for batch, label in dataset.take(1):
    for key, value in batch.items():
      print("{:20s}: {}".format(key,value.numpy()))

数据集中的每个项目都是一个批量,表示为(许多示例,许多标签)的元组。示例中的数据以基于列的张量(而不是基于行的张量)进行组织,每个张量具有与批量大小一样多的元素(本例中为5)。

自己看一下也许会有所帮助。

 1
 2
 3
 4
 5
 6
 7
 8
 9
10
11
show_batch(raw_train_data)

sex                 : [b'female' b'female' b'male' b'female' b'female']
age                 : [ 9. 16. 25. 29. 17.]
n_siblings_spouses  : [4 0 0 1 4]
parch               : [2 0 0 0 2]
fare                : [31.275  7.733  7.05  26.     7.925]
class               : [b'Third' b'Third' b'Third' b'Second' b'Third']
deck                : [b'unknown' b'unknown' b'unknown' b'unknown' b'unknown']
embark_town         : [b'Southampton' b'Queenstown' b'Southampton' b'Southampton' b'Southampton']
alone               : [b'n' b'y' b'y' b'n' b'n']

如你所见,CSV中的列已命名。数据集构造函数将自动获取这些名称。如果使用的文件的第一行不包含列名,则将它们以字符串列表的形式传递给make_csv_dataset函数中的column_names参数。

 1
 2
 3
 4
 5
 6
 7
 8
 9
10
11
12
13
CSV_COLUMNS = ['survived', 'sex', 'age', 'n_siblings_spouses', 'parch', 'fare', 'class', 'deck', 'embark_town', 'alone']
temp_dataset = get_dataset(train_file_path, column_names=CSV_COLUMNS)
show_batch(temp_dataset)

sex                 : [b'male' b'female' b'male' b'female' b'female']
age                 : [48. 45. 28. 60. 36.]
n_siblings_spouses  : [1 0 0 1 0]
parch               : [0 0 0 0 2]
fare                : [76.729  7.75   7.896 75.25  71.   ]
class               : [b'First' b'Third' b'Third' b'First' b'First']
deck                : [b'D' b'unknown' b'unknown' b'D' b'B']
embark_town         : [b'Cherbourg' b'Southampton' b'Southampton' b'Cherbourg' b'Southampton']
alone               : [b'n' b'y' b'y' b'n' b'n']

本示例将使用所有可用的列。如果你需要从数据集中省略一些列,请创建想要使用的列的列表,并将其传递到构造函数的(可选)select_columns参数中。

1
2
3
4
5
6
7
8
9
SELECT_COLUMNS = ['survived', 'age', 'n_siblings_spouses', 'class', 'deck', 'alone']
temp_dataset = get_dataset(train_file_path, select_columns=SELECT_COLUMNS)
show_batch(temp_dataset)

age                 : [28.  40.  20.5 23.  28. ]
n_siblings_spouses  : [0 1 0 3 0]
class               : [b'First' b'Second' b'Third' b'First' b'Third']
deck                : [b'C' b'unknown' b'unknown' b'C' b'unknown']
alone               : [b'y' b'n' b'y' b'n' b'y']

数据预处理

CSV文件可以包含多种数据类型。通常,你需要先将这些混合类型转换为固定长度的向量,然后再将数据输入模型。

TensorFlow有一个用于描述常见输入转换的内置系统:tf.feature_column,请参阅此教程以获取详细信息。

你可以使用任何喜欢的工具(如nltksklearn)对数据进行预处理,然后将处理后的输出传递给TensorFlow。

在模型内部进行预处理的主要优点是,当导出模型时,它包括预处理。这样,你可以将原始数据直接传递到模型。

连续数据

如果你的数据已经采用适当的数字格式,则可以将数据打包为向量,然后再传递给模型:

 1
 2
 3
 4
 5
 6
 7
 8
 9
10
11
12
13
SELECT_COLUMNS = ['survived', 'age', 'n_siblings_spouses', 'parch', 'fare']
DEFAULTS = [0, 0.0, 0.0, 0.0, 0.0]
temp_dataset = get_dataset(train_file_path,
                           select_columns=SELECT_COLUMNS,
                           column_defaults = DEFAULTS)
show_batch(temp_dataset)

age                 : [31. 61. 25. 28. 37.]
n_siblings_spouses  : [0. 0. 0. 0. 0.]
parch               : [0. 0. 0. 0. 1.]
fare                : [13.    32.321  7.896  7.775 29.7  ]

example_batch, labels_batch = next(iter(temp_dataset))

这是一个将所有列打包在一起的简单函数:

1
2
def pack(features, label):
  return tf.stack(list(features.values()), axis=-1), label

将此应用于数据集的每个元素:

 1
 2
 3
 4
 5
 6
 7
 8
 9
10
11
12
13
packed_dataset = temp_dataset.map(pack)
for features, labels in packed_dataset.take(1):
  print(features.numpy())
  print()
  print(labels.numpy())

[[28.     0.     0.     7.775]
 [17.     0.     0.    14.458]
 [34.     0.     0.     8.05 ]
 [ 3.     1.     1.    18.75 ]
 [28.     0.     0.     7.75 ]]

[0 0 0 1 0]

如果你有混合数据类型,则可能需要将这些简单数字字段分开。tf.feature_columnapi可以处理它们,但这会产生一些开销,除非确实需要,否则应该避免。切换回混合数据集:

 1
 2
 3
 4
 5
 6
 7
 8
 9
10
11
show_batch(raw_train_data)

sex                 : [b'female' b'male' b'male' b'male' b'female']
age                 : [28. 28. 44. 23. 18.]
n_siblings_spouses  : [0 0 0 0 0]
parch               : [0 0 0 0 2]
fare                : [12.35   8.05   7.925 13.    13.   ]
class               : [b'Second' b'Third' b'Third' b'Second' b'Second']
deck                : [b'E' b'unknown' b'unknown' b'unknown' b'unknown']
embark_town         : [b'Queenstown' b'Southampton' b'Southampton' b'Southampton' b'Southampton']
alone               : [b'y' b'y' b'y' b'y' b'n']

因此,定义一个更通用的预处理器,该预处理器选择一系列数字特征并将其打包到单个列中:

 1
 2
 3
 4
 5
 6
 7
 8
 9
10
11
12
13
14
15
16
17
18
19
20
21
22
23
24
25
26
27
28
29
30
31
32
33
34
class PackNumericFeatures(object):
  def __init__(self, names):
    self.names = names

  def __call__(self, features, labels):
    numeric_freatures = [features.pop(name) for name in self.names]
    numeric_features = [tf.cast(feat, tf.float32) for feat in numeric_freatures]
    numeric_features = tf.stack(numeric_features, axis=-1)
    features['numeric'] = numeric_features

    return features, labels

NUMERIC_FEATURES = ['age','n_siblings_spouses','parch', 'fare']

packed_train_data = raw_train_data.map(
    PackNumericFeatures(NUMERIC_FEATURES))

packed_test_data = raw_test_data.map(
    PackNumericFeatures(NUMERIC_FEATURES))

show_batch(packed_train_data)

sex                 : [b'male' b'male' b'male' b'male' b'male']
class               : [b'Third' b'Second' b'Second' b'Third' b'Third']
deck                : [b'unknown' b'unknown' b'unknown' b'unknown' b'unknown']
embark_town         : [b'Southampton' b'Cherbourg' b'Southampton' b'Queenstown' b'Cherbourg']
alone               : [b'y' b'n' b'y' b'y' b'n']
numeric             : [[28.     0.     0.     8.05 ]
 [31.     1.     1.    37.004]
 [47.     0.     0.    15.   ]
 [40.5    0.     0.     7.75 ]
 [15.     1.     1.     7.229]]

example_batch, labels_batch = next(iter(packed_train_data))

数据归一化

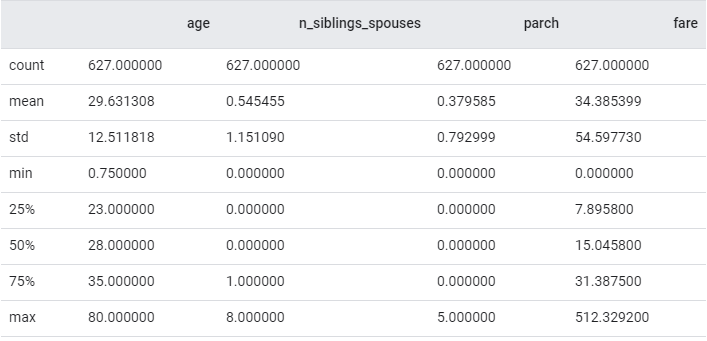
连续数据应始终归一化。

1
2
3
import pandas as pd
desc = pd.read_csv(train_file_path)[NUMERIC_FEATURES].describe()
desc

1
2
3
4
5
6
MEAN = np.array(desc.T['mean'])
STD = np.array(desc.T['std'])

def normalize_numeric_data(data, mean, std):
  # Center the data
  return (data-mean)/std

现在创建一个数值列。tf.feature_columns.numeric_columnAPI接受一个normalizer_fn参数,该参数将在每个批量上运行。

使用functools.partial函数将MEANSTD绑定到normalizer fn

1
2
3
4
5
6
7
# See what you just created.
normalizer = functools.partial(normalize_numeric_data, mean=MEAN, std=STD)
numeric_column = tf.feature_column.numeric_column('numeric', normalizer_fn=normalizer, shape=[len(NUMERIC_FEATURES)])
numeric_columns = [numeric_column]
numeric_column

NumericColumn(key='numeric', shape=(4,), default_value=None, dtype=tf.float32, normalizer_fn=functools.partial(<function normalize_numeric_data at 0x7fbe901b9598>, mean=array([29.631,  0.545,  0.38 , 34.385]), std=array([12.512,  1.151,  0.793, 54.598])))

训练模型时,请选择包含此特征列并将此数据块的数值居中:

 1
 2
 3
 4
 5
 6
 7
 8
 9
10
11
12
13
14
15
16
17
example_batch['numeric']

<tf.Tensor: id=550, shape=(5, 4), dtype=float32, numpy=
array([[18.   ,  0.   ,  1.   , 23.   ],
       [29.   ,  1.   ,  0.   ,  7.046],
       [28.   ,  1.   ,  0.   , 15.5  ],
       [27.   ,  0.   ,  0.   , 76.729],
       [28.   ,  0.   ,  0.   ,  7.75 ]], dtype=float32)>

numeric_layer = tf.keras.layers.DenseFeatures(numeric_columns)
numeric_layer(example_batch).numpy()

array([[-0.93 , -0.474,  0.782, -0.209],
       [-0.05 ,  0.395, -0.479, -0.501],
       [-0.13 ,  0.395, -0.479, -0.346],
       [-0.21 , -0.474, -0.479,  0.776],
       [-0.13 , -0.474, -0.479, -0.488]], dtype=float32)

这里使用的是基于均值的归一化,要求提前知道每一列的均值。

分类数据

CSV数据中的某些列是分类列。也就是说,内容应该是一组有限的选项之一。

使用tf.feature_columnAPI为每个分类创建一个具有tf.feature_column.indicator_column的集合。

 1
 2
 3
 4
 5
 6
 7
 8
 9
10
11
12
13
14
15
16
17
18
19
20
21
22
23
24
25
26
27
28
29
30
31
32
33
CATEGORIES = {
    'sex': ['male', 'female'],
    'class' : ['First', 'Second', 'Third'],
    'deck' : ['A', 'B', 'C', 'D', 'E', 'F', 'G', 'H', 'I', 'J'],
    'embark_town' : ['Cherbourg', 'Southhampton', 'Queenstown'],
    'alone' : ['y', 'n']
}

categorical_columns = []
for feature, vocab in CATEGORIES.items():
  cat_col = tf.feature_column.categorical_column_with_vocabulary_list(
        key=feature, vocabulary_list=vocab)
  categorical_columns.append(tf.feature_column.indicator_column(cat_col))

# See what you just created.
categorical_columns

[IndicatorColumn(categorical_column=VocabularyListCategoricalColumn(key='sex', vocabulary_list=('male', 'female'), dtype=tf.string, default_value=-1, num_oov_buckets=0)),
 IndicatorColumn(categorical_column=VocabularyListCategoricalColumn(key='class', vocabulary_list=('First', 'Second', 'Third'), dtype=tf.string, default_value=-1, num_oov_buckets=0)),
 IndicatorColumn(categorical_column=VocabularyListCategoricalColumn(key='deck', vocabulary_list=('A', 'B', 'C', 'D', 'E', 'F', 'G', 'H', 'I', 'J'), dtype=tf.string, default_value=-1, num_oov_buckets=0)),
 IndicatorColumn(categorical_column=VocabularyListCategoricalColumn(key='embark_town', vocabulary_list=('Cherbourg', 'Southhampton', 'Queenstown'), dtype=tf.string, default_value=-1, num_oov_buckets=0)),
 IndicatorColumn(categorical_column=VocabularyListCategoricalColumn(key='alone', vocabulary_list=('y', 'n'), dtype=tf.string, default_value=-1, num_oov_buckets=0))]

categorical_layer = tf.keras.layers.DenseFeatures(categorical_columns)
print(categorical_layer(example_batch).numpy()[0])

WARNING:tensorflow:From /tmpfs/src/tf_docs_env/lib/python3.6/site-packages/tensorflow_core/python/feature_column/feature_column_v2.py:4276: IndicatorColumn._variable_shape (from tensorflow.python.feature_column.feature_column_v2) is deprecated and will be removed in a future version.
Instructions for updating:
The old _FeatureColumn APIs are being deprecated. Please use the new FeatureColumn APIs instead.
WARNING:tensorflow:From /tmpfs/src/tf_docs_env/lib/python3.6/site-packages/tensorflow_core/python/feature_column/feature_column_v2.py:4331: VocabularyListCategoricalColumn._num_buckets (from tensorflow.python.feature_column.feature_column_v2) is deprecated and will be removed in a future version.
Instructions for updating:
The old _FeatureColumn APIs are being deprecated. Please use the new FeatureColumn APIs instead.
[0. 1. 0. 1. 0. 0. 0. 0. 0. 0. 0. 0. 0. 0. 0. 0. 0. 0. 0. 1.]

稍后在构建模型时,这将成为数据处理输入的一部分。

组合预处理层

添加两个特征列集合,并将它们传递给tf.keras.layers.DenseFeatures以创建一个输入层,该层将提取并预处理这两种输入类型:

1
2
3
4
5
6
preprocessing_layer = tf.keras.layers.DenseFeatures(categorical_columns+numeric_columns)
print(preprocessing_layer(example_batch).numpy()[0])

[ 0.     1.     0.     1.     0.     0.     0.     0.     0.     0.
  0.     0.     0.     0.     0.     0.     0.     0.    -0.93  -0.474
  0.782 -0.209  0.     1.   ]

建立模型

建立一个以preprocessing_layer开始的tf.keras.Sequential

 1
 2
 3
 4
 5
 6
 7
 8
 9
10
11
model = tf.keras.Sequential([
  preprocessing_layer,
  tf.keras.layers.Dense(128, activation='relu'),
  tf.keras.layers.Dense(128, activation='relu'),
  tf.keras.layers.Dense(1, activation='sigmoid'),
])

model.compile(
    loss='binary_crossentropy',
    optimizer='adam',
    metrics=['accuracy'])

训练、评估和预测

现在可以实例化和训练模型。

 1
 2
 3
 4
 5
 6
 7
 8
 9
10
11
12
13
14
15
16
17
18
19
20
21
22
23
24
25
26
27
28
29
30
31
32
33
34
35
36
37
38
39
40
41
42
43
44
45
46
47
train_data = packed_train_data.shuffle(500)
test_data = packed_test_data

model.fit(train_data, epochs=20)

Epoch 1/20
126/126 [==============================] - 2s 15ms/step - loss: 0.5163 - accuracy: 0.7528
Epoch 2/20
126/126 [==============================] - 1s 4ms/step - loss: 0.4242 - accuracy: 0.8214
Epoch 3/20
126/126 [==============================] - 1s 4ms/step - loss: 0.4011 - accuracy: 0.8325
Epoch 4/20
126/126 [==============================] - 1s 4ms/step - loss: 0.3893 - accuracy: 0.8309
Epoch 5/20
126/126 [==============================] - 1s 4ms/step - loss: 0.3915 - accuracy: 0.8357
Epoch 6/20
126/126 [==============================] - 1s 4ms/step - loss: 0.3689 - accuracy: 0.8533
Epoch 7/20
126/126 [==============================] - 1s 4ms/step - loss: 0.3601 - accuracy: 0.8581
Epoch 8/20
126/126 [==============================] - 1s 4ms/step - loss: 0.3547 - accuracy: 0.8501
Epoch 9/20
126/126 [==============================] - 1s 4ms/step - loss: 0.3484 - accuracy: 0.8549
Epoch 10/20
126/126 [==============================] - 1s 4ms/step - loss: 0.3494 - accuracy: 0.8549
Epoch 11/20
126/126 [==============================] - 1s 4ms/step - loss: 0.3410 - accuracy: 0.8565
Epoch 12/20
126/126 [==============================] - 1s 4ms/step - loss: 0.3381 - accuracy: 0.8565
Epoch 13/20
126/126 [==============================] - 1s 4ms/step - loss: 0.3287 - accuracy: 0.8644
Epoch 14/20
126/126 [==============================] - 1s 4ms/step - loss: 0.3278 - accuracy: 0.8565
Epoch 15/20
126/126 [==============================] - 1s 4ms/step - loss: 0.3220 - accuracy: 0.8708
Epoch 16/20
126/126 [==============================] - 1s 4ms/step - loss: 0.3263 - accuracy: 0.8628
Epoch 17/20
126/126 [==============================] - 1s 4ms/step - loss: 0.3167 - accuracy: 0.8708
Epoch 18/20
126/126 [==============================] - 1s 4ms/step - loss: 0.3216 - accuracy: 0.8565
Epoch 19/20
126/126 [==============================] - 1s 4ms/step - loss: 0.3093 - accuracy: 0.8644
Epoch 20/20
126/126 [==============================] - 1s 4ms/step - loss: 0.3141 - accuracy: 0.8676

<tensorflow.python.keras.callbacks.History at 0x7fbe901e1e48>

训练模型后,你可以在test_data数据集上测试模型的准确性。

1
2
3
4
5
6
7
test_loss, test_accuracy = model.evaluate(test_data)

print('\n\nTest Loss {}, Test Accuracy {}'.format(test_loss, test_accuracy))

53/53 [==============================] - 0s 9ms/step - loss: 0.4456 - accuracy: 0.8258

Test Loss 0.44557267272809764, Test Accuracy 0.8257575631141663

使用tf.keras.Model.predict预测批量或批量数据集上的标签。

 1
 2
 3
 4
 5
 6
 7
 8
 9
10
11
12
13
predictions = model.predict(test_data)

# Show some results
for prediction, survived in zip(predictions[:10], list(test_data)[0][1][:10]):
  print("Predicted survival: {:.2%}".format(prediction[0]),
        " | Actual outcome: ",
        ("SURVIVED" if bool(survived) else "DIED"))

Predicted survival: 10.28%  | Actual outcome:  SURVIVED
Predicted survival: 83.55%  | Actual outcome:  SURVIVED
Predicted survival: 39.76%  | Actual outcome:  DIED
Predicted survival: 13.50%  | Actual outcome:  DIED
Predicted survival: 14.96%  | Actual outcome:  DIED